Monday, May 13, 2013

Blossoms...

"Let us be grateful to people who make us happy; they are the charming gardeners who make our souls blossom.”

 ~Marcel Proust 


For my friends...who make me very happy indeed!

xo

Andie


Wednesday, May 1, 2013

In the Gardens...

The good, the bad and the ugly!

A work in progress...

Learning as I go!


Two hundred tulips waking up!

We had three stamped concrete patios installed last Summer. The color is integrated as well as applied atop the uncured cement.  We chose three colors to mimic the patina of slate. The boxwood will eventually form a lovely hedge. Boson Ivy will soon flow over the wall and column like a green wave!

Close-up of one of the patios.  I love the results!  I really labored over the colors. The gentleman at the concrete company talked me out of going darker but I think I would have really liked it darker.  I still love this, however!


Back patio off the sunroom.The pergola will be built this Summer. The armillary sphere is encircled by boxwood and three types of reblooming black-red daylilies.  See the Wisteria in the lower right corner, waiting for something to climb?

View from sunroom door.  I planted the arborvitae close together so they form a hedge to block the view.  I have not mowed around the boxwood because there is a mama bunny under there!  This area will be pea gravel.  The grass does not like the clay soil.

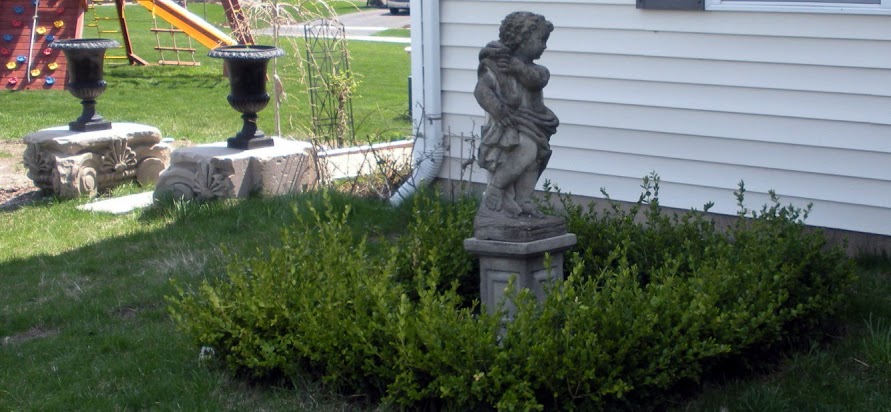
I need to block the view of the neighbor's swingset. This is the beginning of the pea gravel path and Shakespeare Garden that lines the side of the house.  There is another just like it on the other side.  The front and back yards are formal and the sides have an English garden look. All garden ornaments found on Craigslist, including the limestone column capitals from a bank in Wisconsin, to the upper left in this photo.

Lion on the left side of the driveway.  The 200 tulips I planted in November are about to bloom!
I need to block the view of the other neighbor's house and garbage cans on this side.


Newly planted Autumn Blaze Maple toward the back of the front parterre.  Hopefully it will block the primary colors of the neighbor's swingset! You can also see the English flower garden path, closer to the house.  There are hundreds and hundreds of perennials ready to burst into color!
Oh!  How I love garden ornaments!  I am in the process of thinning the herd! THAT is the hardest part!

Craigslist gates, installed at the front of the English pea gravel garden path on opposite side of house.  You can see the roses in their packaging that I am going to plant today!  The espaliered apple trees will go against this wall.

It has proven difficult to get a photo of the entire boxwood parterre!  It is over 20 feet long!   The boxwood circles are six feet in circumference to give you an idea...
The circles are filled with lavender, which has just begun to wake up after a long, cold Winter.  I will be changing the design somewhat.  Also, the larger boxwood will be replaced with lilac standards, which are lilacs grown into tree form.

This is the view from the parterre.  :(


We will also be planting a Yew hedge from the sidewalk and around to where the new tree is, to block the neighbor's yard (see the swingset?) and view from the street. I am still trying to decide what type of Yew to use.  Any advice?

We are also having a retaining wall built so we can plant our potager, which is a fancy French word for fancy French vegetable garden!  
Our entire backyard is on a slope and it is not very large.  That's why the large boxwood parterre was planted in the front.  
Once the retaining wall is built we can plant the potager and build the reflecting pond.

This pavilion was free on Craigslist!  It is difficult to tell but it is surrounded by boxwood.  Soon the red rose garden that encircles the pavilion will be in bloom! This is the third year for the climbing roses, so I hope they begin to cover the iron facade!  The grass will be replaced with pea gravel.  What was I thinking when I put grass there?
The dog statues represent our beloved Max and Lola, our rescue pit bulls.
Lovely view of the empty lot next door, don't you agree?  We are planting more arborvitae behind the structure to block the view.

This cherub fountain spitter from Craigslist has been patiently waiting for the reflecting pool.  Most likely, next year. See how close my back neighbor is?


I just purchased this patio set from Craigslist!  This is the Craigslist photo. I think I will paint it black.  It sits near the pavilion. 


This is where I have been spending my time!  How have you been, friends?

xo

Andie


Sharing with Alison at the Polo House Blog, Favorites On the First!


Saturday, April 20, 2013

I Want to Be Her Friend!

“You've gotta dance like there's nobody watching,
Love like you'll never be hurt,
Sing like there's nobody listening,
And live like it's heaven on earth.”
~William W. Purkey


xo,
Andie


Tuesday, April 16, 2013

Ways To Help Victims of Boston Bombing


Just a brief post to remind you that if you Text REDCROSS to 90999 to give $10 to American Red Cross Disaster Relief, which helps people affected by the bombing in Boston, as well as disaster relief on a larger scale.

Please consider making a donation today.

Here is a list of local Boston organizations and ways they are helping.

A little assistance on how to pray when you want to scream instead.


xo,

Andie

Thursday, April 11, 2013

Espalier! Yay!

Grab a cup of coffee and enjoy this informative video on espaliered trees!  Then try to guess who is getting new trees this Spring?

If you're unfamiliar with espalier, it's a way of training tiny, branchless saplings (called whips) into beautiful two-dimensional shapes. It's generally done with apple or pear trees, but other types of trees such as willow can be used, too. It can take up to four years to accomplish the desired shape, but the result is so stunning, it's worth the wait. Here are some different types of espalier:


This man is a font of knowledge on the topic of espaliered trees...

I could listen to Peter Thevenot's voice all day!  (Especially when he pronounces French words!) When I called the orchards, located in Tennessee, I had to listen really hard to understand what they were saying!


Eight thousand projects and only two hands!  If I were a patient woman I could espalier my own trees.  It doesn't look too difficult!  I'm not getting any younger, though!  I could die before I see the results!


Click here for more information on River Road Farms.


Going to paint my secretary now!


xo

Andie

Wednesday, April 10, 2013

Almost There!

Usually, when I find a piece of furniture, I know exactly what colors I will paint it, which hardware will be used, etc.  Not with this secretary!  After much ado, I have made a decision!  I thought the day would never come!

I have decided on the color...finally!  With the help of pixlr I am able to better envision my goal.  The secretary is currently painted in Annie Sloan Coco.  I will repaint the entire piece in Annie Sloan French Linen, including the finials. (It's the best I can do, Betsy! I cannot figure out how to cut them down!) 
The grisaille panels will be antiqued so they lose the glare.
This is the third set of posters I bought online! More on that later.
The inside will be painted Annie Sloan Louis Blue and Dark Wax!
I had better get to work!

Once it arrives, (from ebay) this mirror frame will have antique mirror added and then secured under the arch above the doors.


Deciding on which direction to take this piece, including color, was the most difficult part.  Now I can have some fun!
I should be finished soon!

Stay tuned!

xo

Andie


Thursday, April 4, 2013

Andie's Folly


Though I love the concept of paintings in the panels I do not love the reality. This is something we would have to look at every day and it was a bit too much.  Furthermore, it doesn't match one single, solitary item in our home!  What was I thinking!?  
Sooo...


Back to the beginning...

and


Grisaille panels on the way!
Actually, they are posters from Zazzle.  The only three halfway decent candidates. I should know!  I looked at about 52,000 posters last night. There is probably a better place to find grisaille paintings but please don't tell me about it.  It's too late. The order is processing.  I might cry.

A few other changes as well.  Not too many!

Now, what can I do with the other panels?  I think I have an idea!

Have you ever had a project like this?   One that had you running in circles and shaking your head in dismay?  One that made you question your abilities and/or your sanity?
Please share your stories so I don't feel alone in my failure!

xo

Andie

Tuesday, April 2, 2013

Step Three, Then Step Two

I wanted to share the process of painting my secretary with my Blog friends!  This is actually step three.  I will show step two next time!
I didn't paint the exterior with Annie Sloan Graphite and Dark Wax until I applied the paintings.  I wanted to be certain I would love the color.  The Graphite is the color found in the background of Rembrandt van Rijn's paintings, as well as many other Old Masters.  I think it is perfect!

I guess we can call the style of this secretary Venetian?  Baroque? Florentine?  After much research I found many secretaries that inspired me, so I chose characteristics from each that I admired...

Niccolo dell’Abbate, Chimney breast 1552, Château, Écouen, France Painting...


Petite Painted Antique French Louis XVI Ladies Secretary...


This Venetian secretary is stunning!  I actually got the idea for the panels when I noticed how lovely the painting looked next to it in this photo!


This color combination was an inspiration. 


Though I love this panel from an 18TH century French secretary, I really don't have the time to copy it!


I was also inspired by this Dutch Baroque inlaid walnut secretary cabinet. It sold for $77,000! 

They are calling this a Venetian, Rococo, Baroque secretary.  I love the details and even considered applying acrylic mirror panels to the doors of my own, until I came to my senses!  It was challenging enough to cut the posters to shape!


The exterior paintings are (L) Birth of the Sun by Corrado Giaquinto,  (R)Triumph of the Seasons by Baldassarre and The Triumph of Flora (Bottom), by Nicholas Poussin.
The entire piece will be painted in Annie Sloan Graphite and the trim, including the finials will be Old White.


This putti is five inches across...it will go near the crown.  I may apply a convex mirror under it but I don't have one here.  Once all the paint and decoupage is done I can look for a suitable mirror if I decide it needs one!  I am still recuperating from the cost of the torch finials on ebay!


I think Annie Sloan Aubusson with Dark Wax for the interior.
These posters are reproductions of allegorical paintings entitled Spring and Autumn, respectively, by Christian Bernhard Rode.

As you may have guessed, I chose a garden theme.  The secretary is in the corner of the Breakfast Room and the paintings are great conversation starters.  It faces the Sunroom and the back gardens.

I cherish your opinions!  What do you think of these choices?

xo

Andie

Monday, April 1, 2013

Trying Everything On...

Hi guys!  Happy April Fool's Day!  I had considered playing a prank but I really cannot top my post from a few years back! The comments are priceless!  I read them again today!  LOL!

Today I want to share the beginning process of the secretary I am working on.  The original factory finish was pretty but it was a little plastic looking.  Too perfect.  Also, the colors weren't working in the Breakfast Room.


I tried on the new (antique) hardware and the flame finials.  It is currently painted in Annie Sloan Coco but I am going over it in Graphite and solely Dark Wax tonight, then I will add the decoupage panels.   I still don't know what color I will paint the interior.  It's a toss up between Annie Sloan Duck Egg, Louis Blue or Aubusson.  Once I install the panels I will have a better idea.


Aren't the tulips beautiful?


This is a better view of the hardware.  I have aged the brassy escutcheons with burnt umber paint.

I am excited about this one!

I hope everything goes as planned!

xo

Andie


Friday, March 29, 2013

__________ Down the Bunny Trail!


Hop:
Main Entry: bound
Part of Speech: verb
Definition: jump, bounce
Synonyms: bob, caper, frisk, gambol, hop , hurdle, leap, pounce, prance, recoil, ricochet, saltate, skip, spring, vault

I thought a fill in the blank would be fun! 
How about this; Saltating down the Bunny Trail?  Doesn't have the same ring, does it?  Pounce is a good one.  All in all, though, hop is best!

I have been busy trying to catch up.  Have any of you ever caught up or is it just a perpetual goal?
We are hosting Easter Brunch and I am really nervous!  We are also having an Easter Egg hunt (leave your weapons at the door) Sunday morning for the neighborhood kids! I really love this time of year!

Boing!!!!

                                                             Boing!!!!!

                    Boing!!!

Wishing all my dear Blog friends and your loved ones a wonderful Easter Sunday!


Here's a little glimpse of what I have been up to with the new (Craigslist) Secretary...
I painted it.  You all knew I would.  Annie Sloan Chalk Paint is like crack!  Annie Sloan Crack Paint!  


Sorry about the watermark ...it was the only copyable image I could find online!


Boing!!!!

Hoppity!  Hoppity! Hoppity!

xo

Andie


Friday, March 22, 2013

Spring...

"His high endeavors are an inward light
That makes the path before him always bright."

~William Wordsworth


When the light peeks in through the window glass I must rush outdoors to greet it before it runs away!

I'll be in the garden if you need me!

xo

Andie

Tuesday, March 19, 2013

Gustavian Armoire Tutorial

Here is the tutorial I promised for the Gustavian Grey Armoire!  I hope you enjoy this as much as I enjoyed the process of its metamorphosis!  I learned so much and I am excited to share it with you!


I love working with hand crafted pieces like this.  Every detail was created by a human being...and it shows.  Unfortunately, these pine Mexican Armoires are outdated, having seen popularity in the mid to late 90's, they are a trend whose time has come.  It is evident by the sheer volume of pieces like this on Craigslist.  This particular armoire is a bit different in that it has a domed top with  a carved cutout in front.
There were some challenges with this armoire.  I wanted to change the vernacular, which meant I had to remove the old hardware.  That was no small feat, because the pulls on these Made In Mexico pieces are not screwed in, they are hammered in!  Lots of effort but it was worth it! I ended up using a hammer and a flat head screwdriver.  Be careful and patient so you don't cut yourself with the screwdriver, like I did!

Pixlr Editor allowed me to envision the piece without the hinges and black hardware and to see what it would look like painted...


A bit about hinges...  I now know everything there is to know about hinges, including their origin and entire history.  There are more than 20 different types.  Three of those types made their way into my home and had to be returned because they would not work on this piece.  The doors are very thick! I ended up using plain old butt hinges.
I chose 2 inch hinges and merely placed them under each existing strap hinge and drilled small pilot holes, then attached them all and finally removed all the existing strap hinges.  I then filled the holes with wood putty and let it dry overnight.

I also filled the knotholes with wood putty.  It required two applications, allowing the putty to dry thoroughly between applications.

I then sanded the putty with a fine grit sandpaper.

Painting came next...

1).  Before
2).  One Coat Annie Sloan Old White
3).  (Not Shown) Second Coat Annie Sloan Old White
4).  One Coat French Linen
5).  Sand with Medium grit sandpaper.

When I create a piece I keep several factors in mind.  First, the history.  I wanted this to resemble a Gustavian antique so I researched the history of Gustavian furniture as well as hardware.  

In 1771, the future Gustav III returned to his native Sweden from the French court of Versailles to ascend the throne as king after his father’s untimely death. The young monarch had been inspired by French architecture and decorative arts and saught to create the "Paris of the North" within the borders of Sweden. Trips to France and later to Italy gave further impetus to Gustav’s passion for the classical. During his reign (1772-1792), the king transformed this once removed European country into a cultural  forerunner within Europe.  Though the introduction of the Gustavian style actually predates Gustav III's reign, it was the young King that was responsible for disseminating the new style throughout the country.

 Early Gustavian decoration was clearly inspired by the French Rococo and later the Neo-classical movements, but the Late Gustavian style was more closely identified with Italy, after engravings from the excavations at Herculaneum and Pompeii began to circulate in Sweden, ushering in the transition between the more romantic Early Gustavianstyle and the stricter lines associated with the furniture of the Late Gustavian period.

 Following these foreign impulses the Swedes created a more restrained or austere style of decoration more suitable for Sweden than the over embellished continental Baroque and Rococo styles.

Original 18th century finishes were achieved by multiple layers of a pigment such as black Iron Oxide, mixed with linseed oil.

The typical Gustavian grey was reached by mixing these two ingredients and the depth of the color depended upon how much iron oxide was used. A high sheen is not common among Gustavian painted piece

Historical artisans used gesso as a primer sealer for filling open-grained woods and as a wood putty to correct natural faults, imperfections and defects in the various substrates they worked on.

Gesso was a do-it-yourself material. It was made by combining plaster of Paris, or gypsum, with liquid hide glues.

The white "primer" coat mimics this finish.  


When I paint a piece I peruse hundreds, if not thousands, of photographs, as well as old paintings.  I look to see how the piece withstood the ages, where the paint is worn away and the patina of time and use.

With this piece I imagined it came from a large home that had only fireplaces for heat and candles for light.  I was heavy handed with the Annie Sloan Dark Wax to mimic the acrid, clinging smoke that no amount of cleaning could erase.  Then I sanded the corners, where busy hands may have grabbed the doors through the centuries, taking bits of paint and depositing oils.  I then sanded around the hardware to mimic the efforts of the housekeeping staff to keep the hardware clean.  I imagined a servant buffing in the same pattern each time she was assigned the task of cleaning this armoire. Up and down...side to side...year after year... until the pattern became engraved upon the surface.  The mops they used sometimes nicked the base of the piece and removed paint.  I can envision them bustling around the armoire in my mind's eye.  Can you?  

One coat of Annie Sloan Clear Wax, followed by a coat of Dark Wax.  I HIGHLY recommend using a wax brush.  It is easier to control and it uses FAR less product than any other method.

Remember to have clean t-shirts or terry towels on hand to rub the wax in after it is applied.


Escutcheon keyhole cover...a little more ornate than I wanted but I could not find the perfect one!  I placed on on the upper right hand cabinet door and the lower right hand cabinet door and used a mock key pull to mimic a key.


I placed one of these laurel, torch keyhole escutcheons on each drawer and used mock key pulls as well.


The escutcheon was antique so I didn't have to age it.  I found two on ebay.  They aren't precisely what I was looking for but close enough.

The mock key pulls had a shiny brass finish.  I first soaked them in acetone to remove the clear sealer, wiped them off , rinsed in hot water, then boiled them in a mixture of salt and white vinegar. I used a ratio of one cup to one cup.
After you boil them for 10 minutes, remove them from the vinegar and salt solution and place them on a baking sheet in the oven at 450 degrees for ten minutes. Please be cautious when working with chemicals and high temperatures!


It is difficult to tell but the finish had a lovely patina.  The photo does not do it justice!  See how the paint is worn away, as if years and years of use and cleaning abraded it?


The piece still needed something, so I found these large finials on ebay.  I think they were probably from an old pair of fireplace andirons.

Perfect!  You can also see how the white peeks through the grey.

I even played around with Pixlr to see if I wanted to paint the trim white.  Though I did like it, I chose not to.  If I did I would use simple drawer pulls (handle type). 

I bought these bun feet on ebay to add to the bottom.  I never did so because Handsome Husband's arm injury meant I had no helper to turn this extraordinarily heavy piece on its side.  They would have looked nice, however.  At five inches, they would have also added some much needed height.


I actually loved it with just one coat of Annie Sloan Old White (2nd photo)!  The pine finish was really easy to work with! The pine showing under the paint had an authentic aged feel.


I absolutely love Before and After collages!


This piece took a bit longer than most but the paint, itself, took fewer than two hours total.
I chose not to paint the interior because I love the pine finish.


I hope I covered everything!  If you have any questions, please feel free to ask!
As of this moment, there are five Mexican Pine armoires on my local Craigslist.  Some even have lovely curved doors!  Every time I come across one I can envision what it could be!  This finish and hardware would be beautiful on Kitchen cabinets, Bathroom cabinets or even small wooden boxes!

xo

Andie

I am participating in Sherry's Open House Party at No Minimalist Here
Yvonne, at Stone Gable, Tutorials, Tips and Tidbits
Marion, at Miss Mustard Seed's Furniture Feature Friday
Courtney, at French Country Cottage, Feathered Nest Friday


LinkWithin

Related Posts Plugin for WordPress, Blogger...